


Ever stared into the air fryer basket, wondering if that chicken breast is perfectly cooked or still a little pink? You’re not alone. Getting chicken breast just right in the air fryer can feel like a culinary tightrope walk. Too little time and you’ve got an undercooked bird; too much and it’s dry and tough. This guide will take the guesswork out of air fryer chicken breast, giving you juicy, tender results every time. You’ll learn the exact timing, temperature, and tips to ensure success, so you can enjoy delicious, healthy meals without the stress.
Perfect Air Fryer Chicken Breast Timing
Achieving perfectly cooked chicken breast in an air fryer at 400 degrees Fahrenheit is all about striking a balance between heat and time. The high temperature of the air fryer is excellent for creating a crispy exterior while keeping the inside moist. However, because air fryers circulate hot air very efficiently, chicken can cook surprisingly quickly. Understanding the precise duration is key to avoiding overcooked, dry chicken or undercooked, unsafe poultry.
This section will focus on the core elements that determine the cooking time, including the thickness of the chicken breast, whether it’s bone-in or boneless, and how to check for doneness accurately. We’ll break down the typical cooking window and provide actionable advice for adjusting it based on your specific air fryer model and the exact cut of chicken you are using.
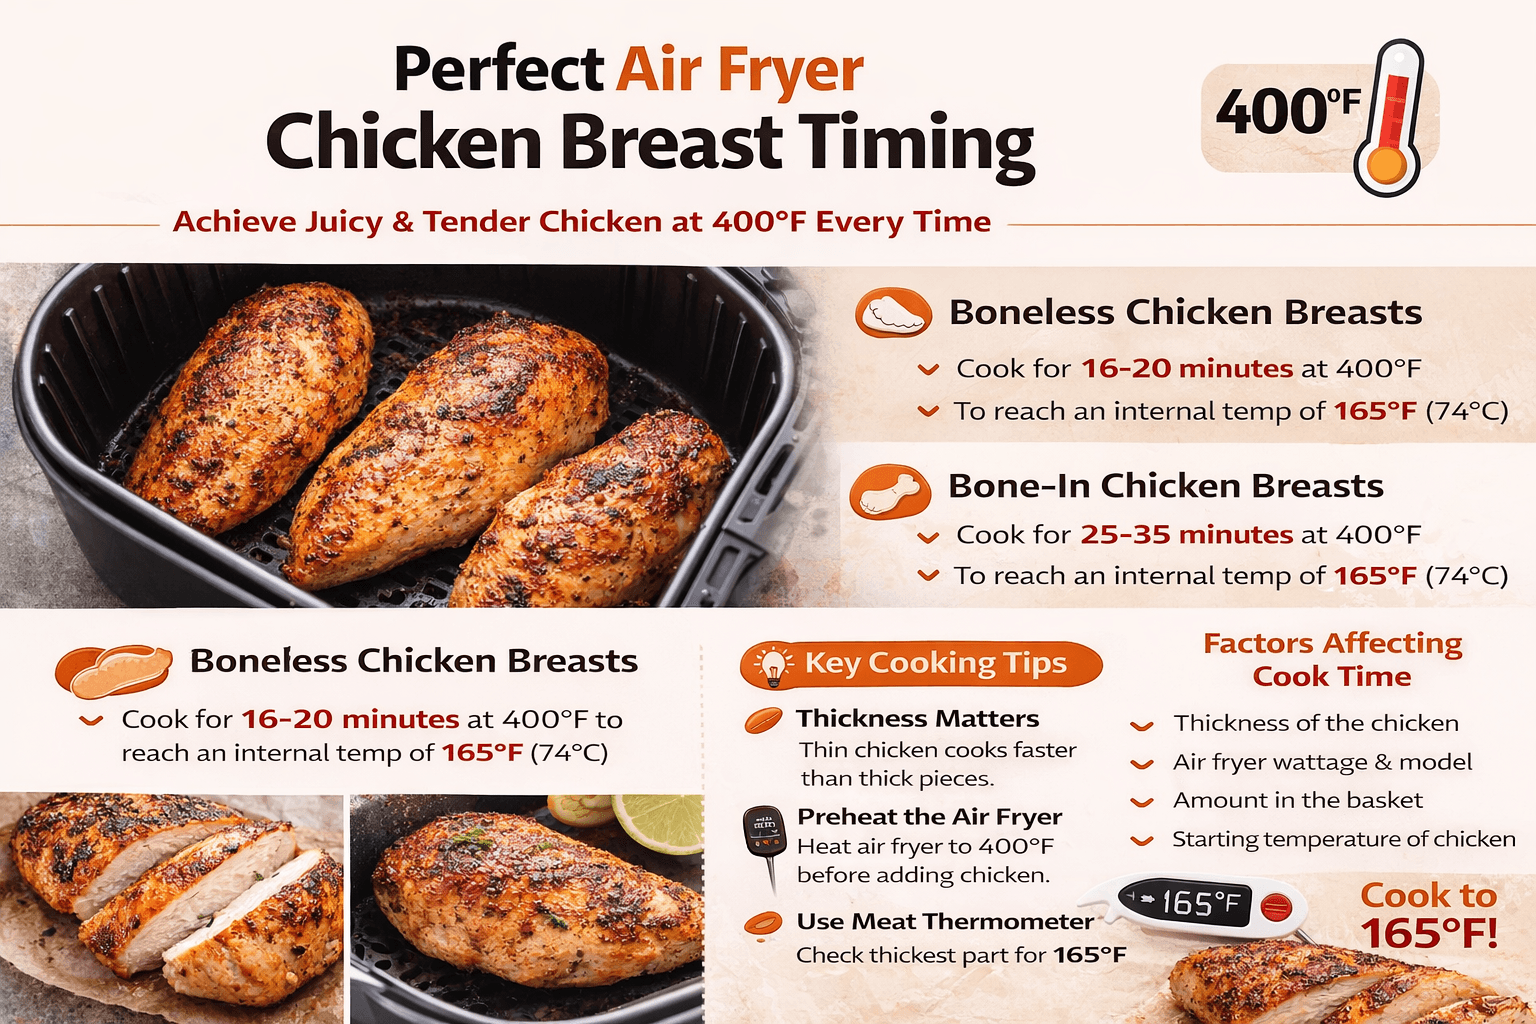
Boneless Skinless Chicken Breast Cooking Times
For boneless, skinless chicken breasts at 400°F, the magic number is generally between 16 to 20 minutes. This timeframe allows the chicken to cook through safely while remaining tender and juicy. It’s important to remember that this is an estimate, and several factors can influence the actual cooking duration.
Thickness plays a significant role. A thinner breast will cook faster than a thicker one. Preheating your air fryer is also crucial, as it ensures consistent heat from the moment the chicken goes in. If you don’t preheat, you might need to add a few extra minutes to the cooking time.
- Check Internal Temperature: The most reliable way to know if your chicken is done is by using a meat thermometer. Insert it into the thickest part of the chicken breast. It should register 165°F (74°C). This internal temperature ensures the chicken is safe to eat.
- Resting Time: After cooking, let the chicken rest for 5-10 minutes. This allows the juices to redistribute throughout the meat, resulting in a more tender and flavorful bite. Skipping this step can lead to juices running out when you cut into the chicken, making it seem dry.
- Flip Halfway Through: For even cooking and browning on both sides, flip the chicken breasts halfway through the cooking process. This ensures that each side gets direct exposure to the hot air circulation.
The air fryer’s performance can vary depending on the brand and model. Some air fryers run hotter than others, which might slightly reduce the cooking time needed. Always start checking for doneness at the lower end of the recommended time range.
Bone-In Chicken Breast Cooking Times
Cooking bone-in chicken breasts in the air fryer at 400°F requires a bit more time due to the presence of the bone, which acts as an insulator and slows down heat penetration. Expect these to take longer, typically in the range of 25 to 35 minutes. The bone makes it harder for heat to reach the center of the meat efficiently.
Just like with boneless breasts, the thickness of the chicken and the size of the bone will affect the cooking duration. Thicker bone-in breasts, especially those with a substantial bone, will lean towards the longer end of this spectrum.
- Preheat is Essential: Preheating your air fryer to 400°F is even more critical for bone-in chicken. This helps to quickly create a sear on the outside, locking in moisture while the heat gradually works its way through to the bone.
- Adjust for Bone Size: Larger bones take longer to heat through. If you have particularly large bone-in breasts, it’s wise to start checking the internal temperature around the 25-minute mark.
- Use a Thermometer Religiously: Due to the variable cooking nature of bone-in chicken, a meat thermometer is your best friend. Aim for that same safe internal temperature of 165°F (74°C) in the thickest part of the meat, away from the bone.
It’s also worth noting that bone-in chicken breasts often have more natural fat and connective tissue, which can contribute to a more flavorful and moist result even if the cooking process is slightly longer.
Factors Affecting Cooking Time
Several variables can influence exactly how long to cook chicken breast in air fryer at 400. Understanding these can help you fine-tune the process for consistently delicious results.
- Thickness of the Chicken: This is arguably the most significant factor. A chicken breast that is uniformly thin will cook much faster than one that has a thick, bulbous end. You can pound thicker breasts to an even thickness for more consistent cooking, or adjust your time accordingly.
- Starting Temperature of the Chicken: Chicken that is closer to room temperature will cook faster than chicken straight from a very cold refrigerator. Allowing chicken to sit out for 10-15 minutes before air frying can make a difference, but always ensure it doesn’t sit out for too long to avoid food safety concerns.
- Air Fryer Wattage and Design: Different air fryer models have varying efficiencies and heating elements. Some models may circulate air more intensely, leading to faster cooking. Older models or those with less powerful fans might require slightly longer cooking times.
- Amount of Chicken in the Basket: Overcrowding the air fryer basket is a common mistake. When the basket is too full, hot air cannot circulate effectively around each piece of chicken. This leads to uneven cooking, where some pieces might be done while others are still raw. It’s often better to cook chicken in batches if necessary.
It is a good practice to experiment with your specific air fryer to find the perfect timing for different thicknesses and cuts of chicken.
Preparing Chicken Breast For Air Frying
Proper preparation is just as important as the cooking time itself. Taking a few steps before your chicken breast hits the air fryer basket can elevate your results from good to great.
This involves seasoning, marinating, and ensuring the chicken is at an optimal temperature for cooking. These steps not only enhance flavor but also contribute to the texture and juiciness of the final dish.
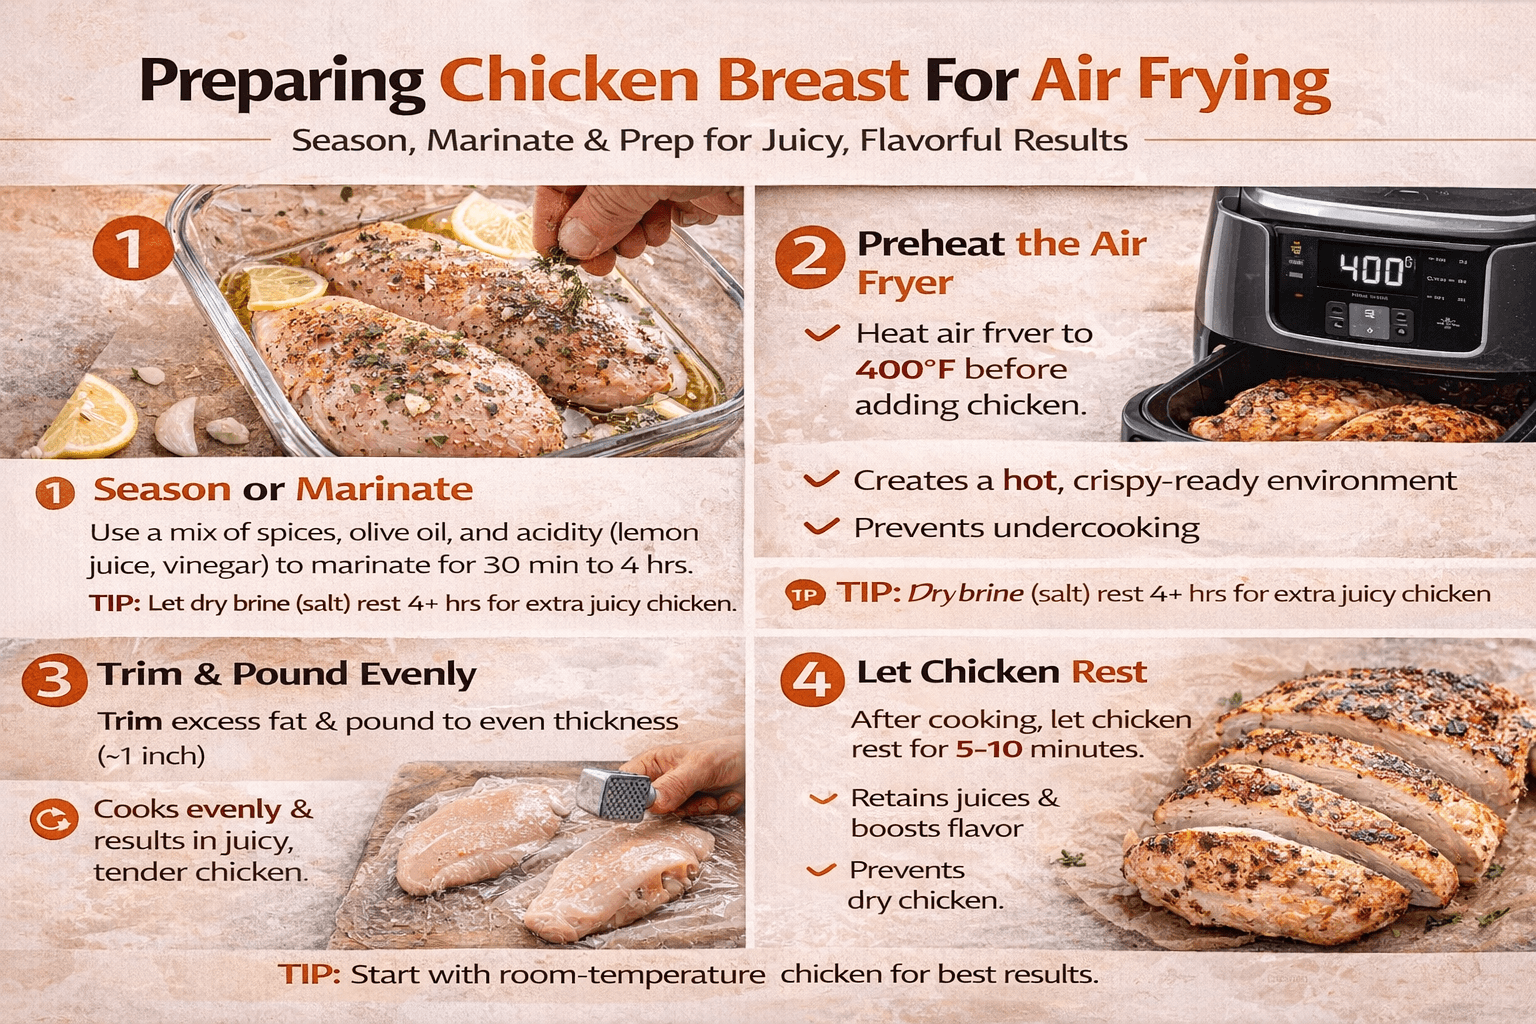
Seasoning and Marinades
Seasoning is the simplest way to add flavor. A basic salt and pepper rub is effective, but don’t be afraid to experiment with herbs, spices, garlic powder, onion powder, paprika, or even a touch of cayenne for heat.
Marinating offers a deeper level of flavor and can also help tenderize the chicken. Common marinade ingredients include olive oil, lemon juice or vinegar (for acidity), soy sauce or Worcestershire sauce (for umami), and various herbs and spices. For boneless, skinless chicken breasts, marinating for at least 30 minutes, and up to 4 hours in the refrigerator, is usually sufficient.
A real-life example: Sarah decided to marinate her chicken breasts in a mixture of Greek yogurt, lemon juice, garlic, and dill for two hours before air frying. The result was incredibly tender chicken with a bright, fresh flavor that her family loved.
- Dry Brining: For an extra juicy and flavorful chicken breast, consider dry brining. This involves coating the chicken with salt and letting it sit in the refrigerator for at least 4 hours, or even overnight. The salt draws out moisture, then reabsorbs it along with the salt, seasoning the meat deeply and helping it retain moisture during cooking.
- Oil for Crisping: A light coating of oil, such as olive oil or avocado oil, brushed onto the chicken before seasoning can help achieve a crispier exterior in the air fryer. It also helps the seasonings adhere better.
- Even Coating is Key: Ensure your seasonings or marinade are applied evenly to all sides of the chicken breast. This guarantees a consistent flavor throughout.
When marinating, remember that acidic ingredients like lemon juice or vinegar can “cook” the chicken if left too long, leading to a mushy texture.
Preheating Your Air Fryer
Preheating your air fryer to 400°F is a non-negotiable step for achieving the best results. This ensures that the chicken breast begins cooking immediately and evenly upon entering the basket.
Without preheating, the chicken is exposed to gradually increasing heat, which can result in uneven cooking. The outside might overcook before the inside is safely done, or the skin won’t crisp up as effectively.
Preheating allows the air fryer to reach and maintain its set temperature of 400°F consistently. This is similar to how a conventional oven needs to be preheated before baking or roasting. The circulating hot air in the air fryer is what cooks the food, and starting at the optimal temperature creates the ideal environment for crisping and cooking through.
A common mistake is placing food directly into a cold air fryer. This not only extends the cooking time but also compromises the texture and overall quality of the cooked chicken.
Trimming and Pounding Chicken Breasts
Before you season or marinate, it’s a good idea to trim any excess fat or sinew from the chicken breasts. While some fat adds flavor, too much can cause smoking in the air fryer.
For boneless, skinless breasts that are uneven in thickness, pounding them to a uniform size is highly recommended. This can be done by placing the chicken breast between two pieces of plastic wrap or in a resealable bag and gently pounding it with a meat mallet, rolling pin, or even the bottom of a heavy pan. Aim for a thickness of about 3/4 to 1 inch.
Uniform thickness is crucial for even cooking. When chicken breasts have varying thicknesses, the thinner parts will cook and dry out long before the thicker parts reach a safe internal temperature of 165°F. Pounding ensures that all parts of the chicken breast cook at roughly the same rate, leading to a more tender and juicy outcome.
A simple scenario: Imagine you have two chicken breasts. One is a slender 1/2 inch thick, and the other is a hefty 1.5 inches thick at its widest point. If you air fry them together without adjusting, the thin one will be done in about 10 minutes and likely dry, while the thick one might still be raw after 25 minutes. Pounding them both to, say, 1 inch thick before cooking means they will both finish around the same time, likely within the 16-20 minute range.
Checking Chicken Breast For Doneness
Knowing when your chicken breast is perfectly cooked is the ultimate goal. Overcooking is the most common culprit behind dry, rubbery chicken, while undercooking poses a food safety risk.
This section will guide you through the most reliable methods for checking if your chicken breast has reached the ideal internal temperature.
Using a Meat Thermometer
The most accurate and safest way to determine if a chicken breast is cooked through is by using an instant-read meat thermometer. This tool is indispensable for any home cook looking to achieve consistently good results.
Insert the thermometer into the thickest part of the chicken breast, ensuring that it does not touch any bone (if cooking bone-in). The target internal temperature for chicken breast is 165°F (74°C). Once the thermometer registers this temperature, the chicken is safe to eat and perfectly cooked.
It’s important to note that the temperature will continue to rise a few degrees after you remove the chicken from the air fryer, a process called carryover cooking. So, you can safely remove the chicken when it reaches about 160-162°F (71-72°C), and it will reach 165°F as it rests.
Statistics show that foodborne illnesses related to undercooked poultry are a significant public health concern. A 2022 report from the CDC indicated that an estimated 1 in 6 Americans get sick from foodborne illnesses each year, with poultry being a common source. Using a thermometer dramatically reduces this risk.
- Calibration Check: Before relying on your thermometer, check its calibration. You can do this by placing the probe in a cup of ice water. It should read 32°F (0°C). Then, place it in boiling water; it should read 212°F (100°C).
- Multiple Readings: For larger or thicker pieces of chicken, take readings in a few different spots to ensure the entire breast has reached the target temperature.
- Digital vs. Dial Thermometers: Digital instant-read thermometers are generally faster and more accurate than older dial thermometers, providing readings in just a few seconds.
Always remember to clean your meat thermometer thoroughly after each use with hot, soapy water to prevent the spread of bacteria.
Visual Cues and Texture Tests
While a thermometer is the most precise tool, visual cues and texture tests can offer helpful secondary checks, especially if you’re in a pinch.
When chicken breast is properly cooked, the juices that run out when pierced with a fork should be clear, not pink or bloody. The flesh itself should be opaque white throughout, with no pink or red areas visible.
The texture is also an indicator. Cooked chicken breast will be firm but tender. If you press down on it with a fork, it should feel slightly resistant but not tough or rubbery.
Overcooked chicken will feel dry and stringy, while undercooked chicken will be soft and mushy.
A common scenario for visual checking: You cut into a chicken breast, and the juices are crystal clear, and the meat inside is completely white. This usually means it’s done. However, relying solely on visual cues can be misleading, as the color can sometimes be affected by marinades or spices.
Understanding Carryover Cooking
Carryover cooking is a phenomenon where food continues to cook after it has been removed from the heat source. This happens because the residual heat within the food continues to transfer from the hotter exterior to the cooler interior.
For chicken breast cooked in an air fryer at 400°F, this carryover cooking can be significant. The high temperature of the air fryer heats the chicken rapidly, and this stored heat will continue to raise the internal temperature by a few degrees after you take it out.
This is precisely why it’s recommended to remove chicken breast from the air fryer when its internal temperature reaches 160-162°F (71-72°C). By the time it has rested for 5-10 minutes, it will have safely reached the target of 165°F (74°C) without being overcooked. Failing to account for carryover cooking is a primary reason why many people end up with dry chicken.
A study published in the Journal of Food Science highlighted that the extent of carryover cooking depends on the thickness of the food, the cooking temperature, and the resting time. For thicker cuts of meat cooked at high temperatures, carryover cooking can account for a rise of 5-10°F.
Troubleshooting Common Air Fryer Chicken Issues
Even with the best intentions and recipes, sometimes air fryer chicken breast doesn’t turn out perfectly. This section addresses common problems and provides solutions to help you get it right next time. We’ll cover issues like dry chicken, uneven cooking, and lack of crispiness.
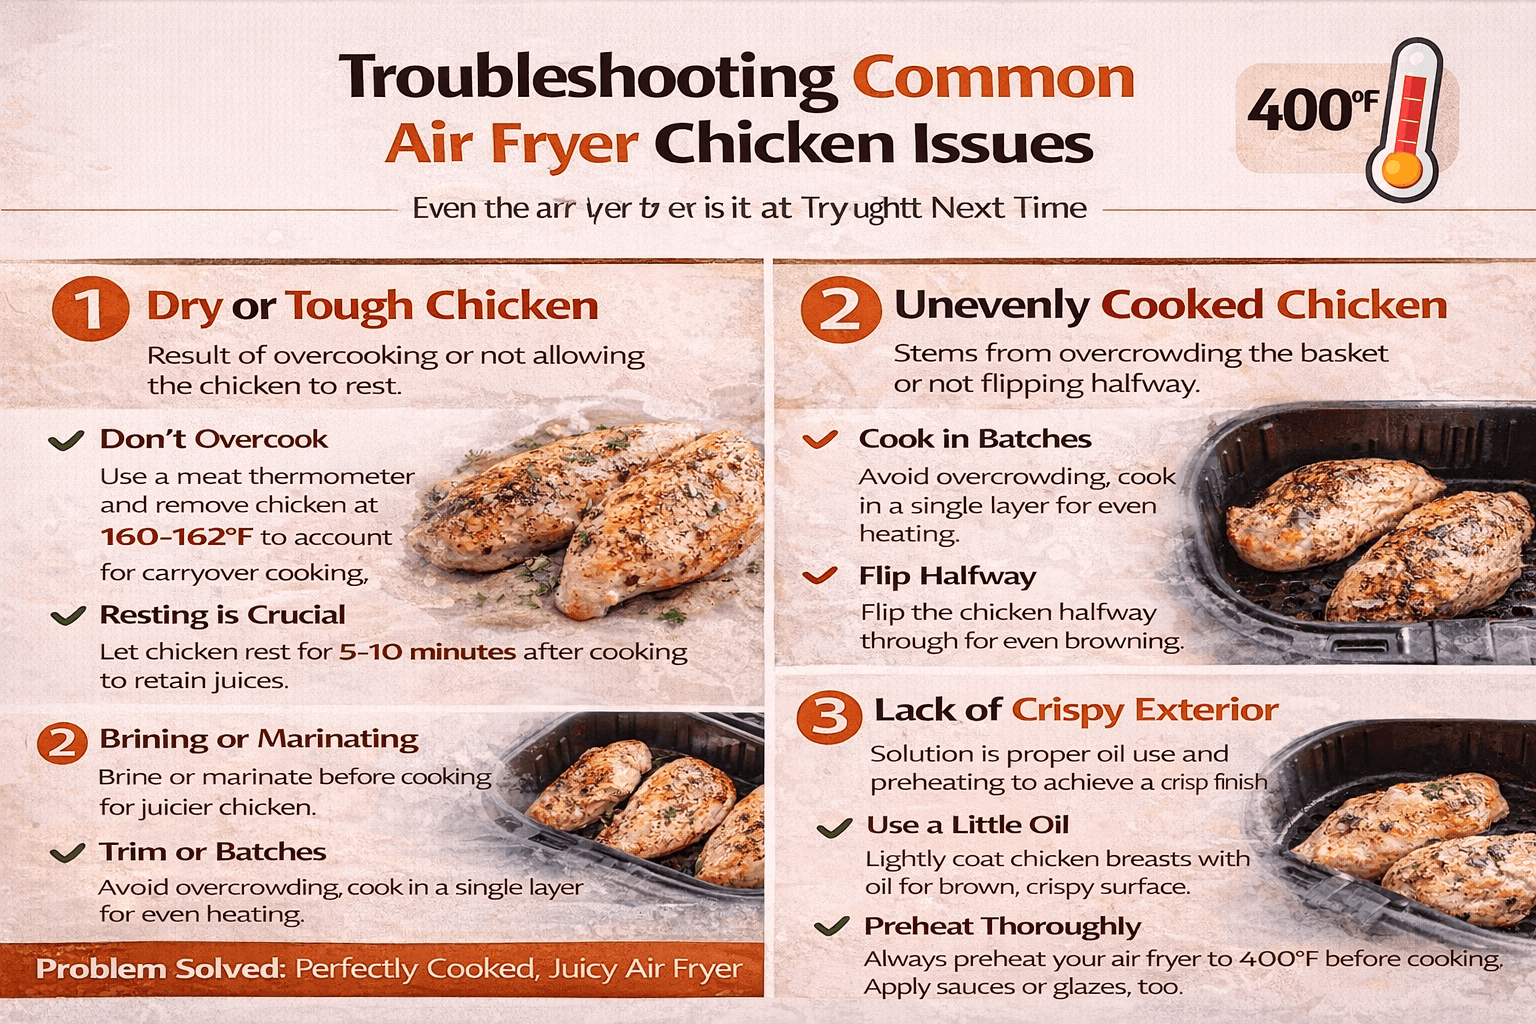
Dry or Tough Chicken
The most frequent complaint about air fryer chicken breast is that it turns out dry and tough. This is almost always a result of overcooking or not allowing the chicken to rest properly.
The lean nature of chicken breast means it has very little fat, making it unforgiving when overcooked. Even a few extra minutes in the air fryer can push it past its optimal point, causing the proteins to seize up and expel moisture, leading to that undesirable dry and tough texture. Another reason can be insufficient resting time after cooking.
- Don’t Overcook: This is the golden rule. Use a meat thermometer and remove the chicken breast when it reaches 160-162°F (71-72°C), accounting for carryover cooking.
- Resting is Crucial: Always let your chicken breast rest for at least 5-10 minutes after cooking. This allows the juices to redistribute evenly throughout the meat, making it moist and tender.
- Brining or Marinating: Consider brining or marinating your chicken breasts before cooking. A simple brine (saltwater solution) or a flavorful marinade can significantly improve moisture retention and tenderness.
Unevenly Cooked Chicken
Uneven cooking in the air fryer often stems from overcrowding the basket or not flipping the chicken halfway through the cooking process.
The air fryer works by circulating hot air around the food. If the basket is too full, the hot air cannot reach all surfaces of the chicken evenly. This can result in some pieces being cooked perfectly, while others remain undercooked or dry.
Similarly, if the chicken isn’t flipped, one side may receive more direct heat than the other.
- Cook in Batches: Avoid overcrowding the air fryer basket. If you have multiple chicken breasts, cook them in a single layer without overlapping. It’s better to cook in two smaller batches than to overstuff one batch.
- Flip Halfway: Ensure you flip the chicken breasts halfway through the cooking time (around the 8-10 minute mark for boneless breasts). This promotes even browning and cooking on both sides.
- Arrange Properly: Within the basket, arrange the chicken breasts so they have some space around them. This allows for maximum air circulation.
Lack of Crispy Exterior
While chicken breast isn’t typically served with crispy skin like thighs or wings, you might still want a nicely browned and slightly crisp exterior.
A lack of crispiness can be due to not using enough oil, not preheating the air fryer sufficiently, or cooking at too low a temperature. The high heat and circulating air are what create that desirable, slightly crisp texture.
- Use a Little Oil: Lightly brush or spray the chicken breasts with a bit of cooking oil before seasoning. This helps create a surface that can brown and crisp up.
- Preheat Thoroughly: Ensure your air fryer is fully preheated to 400°F. Placing chicken into a hot air fryer helps achieve an immediate sear and crispness.
- Don’t Cover the Chicken: Make sure the chicken is exposed directly to the hot air. If you’re using any sauces or glazes, consider applying them during the last few minutes of cooking to prevent them from burning and to allow the chicken to crisp up first.
How Long To Cook Chicken Breast In Air Fryer At 400? Related FAQs
Question: What is the internal temperature for cooked chicken breast?
Answer: The safe internal temperature for cooked chicken breast is 165°F (74°C). Always use a meat thermometer to verify this in the thickest part of the meat.
Question: Should I marinate chicken breast before air frying?
Answer: Marinating chicken breast is highly recommended as it adds flavor and helps to tenderize the meat, making it more moist and juicy.
Question: Can I cook frozen chicken breast in the air fryer at 400?
Answer: While possible, cooking frozen chicken breast at 400°F is not ideal. It can lead to uneven cooking, with the outside burning before the inside is cooked through. It’s best to thaw chicken breast completely before air frying for optimal results.
Question: How many chicken breasts can I cook at once in an air fryer?
Answer: This depends on the size of your air fryer basket. For best results, cook chicken breasts in a single layer without overlapping to ensure proper air circulation and even cooking.
Question: Do I need to flip the chicken breast halfway through air frying?
Answer: Yes, flipping the chicken breast halfway through the cooking time is recommended for even browning and to ensure that both sides are cooked thoroughly.
Common Myths Debunked
Myth 1: You can cook chicken breast from frozen at 400°F with the same results as fresh.
Reality: While you can technically cook chicken breast from frozen in an air fryer, it’s not recommended for achieving optimal results. Cooking from frozen at 400°F often leads to the exterior burning or becoming dry before the interior reaches a safe temperature of 165°F. The cooking time will also be significantly longer and harder to manage.
It’s always best to thaw chicken breast completely before air frying for even cooking and a better texture.
Myth 2: Air frying chicken breast will always make it dry.
Reality: This myth often stems from improper cooking techniques. Chicken breast is a lean meat and is unforgiving to overcooking. However, when cooked for the correct amount of time, at the right temperature (like 400°F), and allowed to rest, air-fried chicken breast can be incredibly moist and tender.
The key is to avoid overcooking and to check for doneness accurately using a meat thermometer.
Myth 3: You don’t need to preheat an air fryer for chicken breast.
Reality: Preheating your air fryer is a critical step for any recipe, including chicken breast. Just like a conventional oven, an air fryer needs to reach its target temperature before cooking begins. Preheating ensures that the chicken starts cooking immediately and evenly, leading to better texture, browning, and a more consistent internal cook.
Placing chicken in a cold air fryer will result in longer cooking times and potentially less desirable results.
Myth 4: All air fryers cook chicken breast in the exact same amount of time.
Reality: Air fryer models vary in wattage, fan strength, and internal design. These differences mean that cooking times can differ between brands and even between models of the same brand. While general guidelines exist, it’s essential to understand your specific air fryer and to use a meat thermometer to confirm doneness rather than relying solely on time.
Final Thoughts
Mastering the cooking time for chicken breast in an air fryer at 400 degrees Fahrenheit transforms a potentially dry meal into a delicious, healthy staple. The ideal cooking window, typically between 16 to 20 minutes for boneless breasts, hinges on several factors, including thickness, preheating, and whether you’re using bone-in or boneless cuts. Always aim for an internal temperature of 165°F, verifying with a reliable meat thermometer, and never skip the crucial resting period of 5-10 minutes after cooking, which allows juices to redistribute for ultimate tenderness. By understanding and applying these principles – from proper preparation with seasonings and marinades to troubleshooting common issues like dryness or uneven cooking – you can consistently achieve perfectly cooked, juicy chicken breast. Experiment with your air fryer, paying attention to the thickness of your chicken, and trust your thermometer.
Recent Posts
Upgrade your kitchen now! See our 5 best microwaves drawer reviews. Make an informed purchase and save time and space.
Score the best microwaves under 50 dollars! Our 5 top product reviews help you save money and eat well. Get yours now!.